- In Netscape, click on "Edit", then select "Preferences".
- In the dialog box, select "Composer".
- The box shown below is displayed.
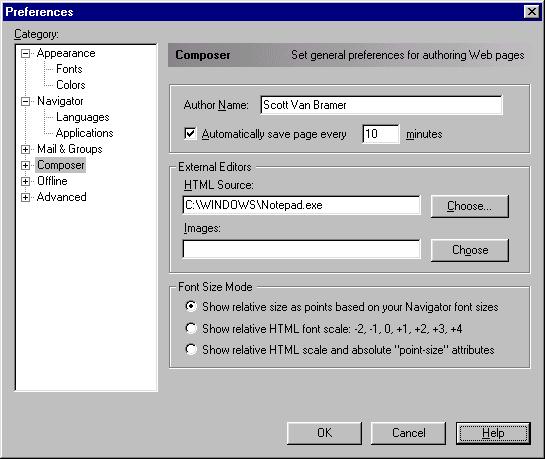
The following options are available.
- Author Name. Enter your name here. This information is included in the heading information for any web page. This is not displayed in the browser, but can be used for other features.
- Automatically Save. This will automatically save the document you are working with on your hard drive. So if your computer crashes you will not loose everything. TURN THIS FEATURE ON.
- External Editors, HTML Source. This lets you edit the raw HTML code. I suggest using notepad for this. On most computers enter "c:\windows\notepad.exe". If that does not work, use the browse button to find the program. If you regularly edit long HTML documents, I would suggest using the program "wordpad".
- External Editors, Images. This automatically links from composer to a program for editing image files. LView is a nice freeware package.
- Font Size Mode. I recommend against using absolute point sizes for web pages. Use relative sizes so that users can specify the base font size, and the web page author just indicates that it should be larger or smaller.
- Help. Read this for more information.
- In "Edit, Preferences", Click on the + symbol to the left of the word "Composer". This will open a branch in the menu. Now click on "Publishing" to display the following options:
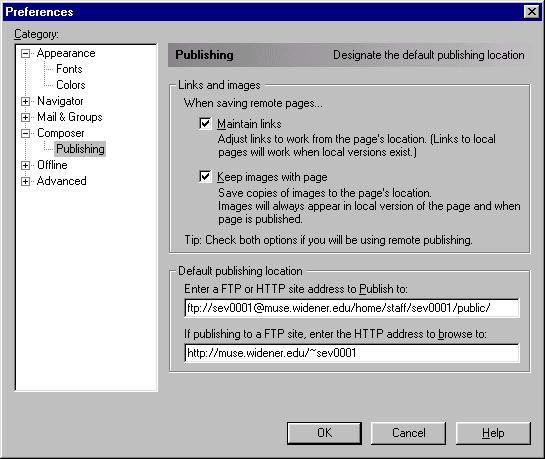
- When saving remote pages, Maintain links. This is important for making links work on your local machine while you are editing a document, and on the remote machine when you load it on the web server. It is important that you keep current copies of all files in both locations. This is easily done by always saving and publishing any changes that you make.
- When saving remote pages, Keep images with page. This is important for keeping images displayed in a document in the correct place.
- Default publishing location, Enter FTP or HTTP site. This is the address where you are loading your web pages. The proper syntax for publishing on Muse is given below. sev0001 is my login ID, and as a faculty member my files are in the staff directory.
ftp://sev0001@muse.widener.edu/home/staff/sev0001/public/ - Default publishing location, If publishing to a FTP site. This is the address that Netscape uses to look at the document after you publish it. This URL is different than the FTP URL. The proper syntax for browsing on Muse is:
http://muse.widener.edu/~sev0001 - Help. Click on this button for more information.
- To upload a file from Composer (after all the above is configured), click on the "Publish" button and the following dialog box will appear:
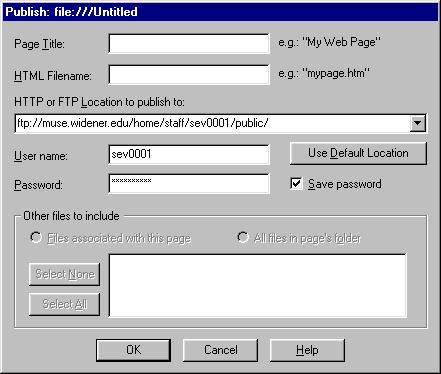
- Page Title. This is the title of the web page. The browser displays it at the top of the window. This may include spaces and may be as long as you like.
- HTML Filename. This is the filename for the web page. I recommend using only letters and numbers, no spaces and no special characters. Remember UNIX is case sensitive (so the name HOME.HTML is a different file than home.html). The file extension (the part after the period) should be html. If you are using Windows 3.1 you may need to use "htm" as the extension. Unix filenames are not restricted to eight characters, but it is a good idea to follow that convention. The "home" page in any directory (the one you want people to start with) should have the name index.html.
- HTTP or FTP Location to publish to. This should come up with the default address entered above. This box has a pull down menu (click on the down arrow at the right) that will list any other directories or servers that you use. The syntax for this line is:
ftp://sev0001@muse.widener.edu/home/staff/sev0001/public/ - User name. This is your login id.
- Password. This is your password. If you click on the box to the right, Netscape will remember your password. When you change your password on Muse, this entry must be updated.
- Other files to include. If you need to upload additional pages to the same directory, select them from this box.
- Open FTP software and connect to Muse (muse.widener.edu). You will need to enter your login id and password.
- Copy files from local machine to Muse, place them in your public directory. You may create subdirectories within the public directory to organize your files.
- The file named index.html is the default web page for a directory. You should use this file name for your home page. If you use subdirectories you can use the file name index.html as the top page in each directory.
- I recommend using only letters and numbers, no spaces and no special characters for file names.
- UNIX is case sensitive (so the name HOME.HTML is a different file than home.html).
- The file extension (the part after the period) should be html. If you are using Windows 3.1 you may need to use "htm" as the extension.
- Unix filenames are not restricted to eight characters, but it is a good idea to follow that convention.
- The "home" page in any directory (the one you want people to start with) should have the name index.html.
- Some FTP software will convert all file names to lower case, this may cause problems with your links.
- Use relative addresses in links when possible. Examples demonstrating this are given in the documents on How to make HTML documents.
- Telnet to Muse. If your web browser is properly configured this link will start the program and provide you with a login prompt. At the prompt enter your login id. Then at the password prompt enter your password. If the link does not work:
- Look on your system for a program called telnet (or something similar). Run this program to connect to muse.widener.edu.
- If you can't find a program, download and install one from the web. The Tucows web site has lots of freeware telnet applications. I use the one called TeraTerm.
- After you log into Muse, switch to the public directory. "cd public"
- Change the permissions for all the files in this directory. "chmod 755 *.*"
- If your files are in a subdirectory, switch to the appropriate directory and change the permissions.
- logout.
- Below is a transcript from a typical telnet session. I have set the text that I entered to display in bold to help you follow along. At the end of each line I typed, I pressed the "Enter" key:
HP-UX Muse B.10.20 U 9000/829 (ttyp7)

login: sev0001
Password:
Last   successful login for sev0001: Fri May 22 15:38:04 GMT 1998 on ttyp7
Last unsuccessful login for sev0001: Mon Apr 20 19:53:53 GMT 1998 on ttyqb
Please wait...checking for disk quotas

Checking for mail ...


No mail in INBOX.

Disk quotas for sev0001 (uid 1012):
Filesystem     usage  quota  limit    timeleft  files  quota  limit    timeleft
/home            36  10240  12288                 20      0      0
ls -Muse [21] % ls -l
total 2
drwx------   2 sev0001    staff         1024 Aug 30  1996 Mail
drwxr-x--x   2 sev0001    staff           96 May 22 11:45 public
Muse [22] % cd public
Muse [23] % ls -l
total 8
-rwxr-xr-x   1 sev0001    staff         1069 Sep 17  1997 index.html
-rw-r-----   1 sev0001    staff          400 May 22 11:45 temp.html
-rw-r-----   1 sev0001    staff          298 May 22 11:43 test.html
Muse [24] % chmod 755 *.*
Muse [25] % ls -l
total 8
-rwxr-xr-x   1 sev0001    staff         1069 Sep 17  1997 index.html
-rwxr-xr-x   1 sev0001    staff          400 May 22 11:45 temp.html
-rwxr-xr-x   1 sev0001    staff          298 May 22 11:43 test.html
Muse [26] % logout
- Some Comments on each entry
- Login: This is your login id for Muse.
- Password: No text is displayed here because the password is not displayed as it is entered (so nobody can look over your shoulder and steal your password)
- ls -l (that is "ell" s "space" "hyphen" "ell"). This command lists all the files in the directory with their permissions. Below this command is the listing of files returned by Muse. Using the example line:
-rwxr-xr-x 1 sev0001 staff 1069 Sep 17 1997 index.html The information displayed for each line includes:- -rwxr-xr-x - This is the current "permissions". This is broken down into a series of codes. The first character "-" changes to a "d" if it is a directory. The next three characters "rwx" are the permissions (read, write, execute) for the file owner (me). The next three characters "r-x" are the file permissions (read and execute) for the "group" (In this case other staff at widener), the last three characters "r-x" are the file permissions for the "world".
- 1
- sev0001 - The file owner (me)
- staff - The group the file owner belongs to
- 1069 - The file size
- Sep 17 1997 - Date the file was created
- index.html - The file name
- cd public - This changes to the public directory (notice that after the first ls -l command, the listing shows two directories. The first directory is "Mail" and is only accessible by the account owner. The second directory is "public" and is accessible for read, write and execute) by the owner; accessible for reading and executing by the group; and accessible for reading and executing by the world.
- chmod 755 *.* - This changes the permissions for all the files in the current directory (public). Be careful with this command, if you use the wrong numbers or use it in the wrong place, it can make a mess.
- ls -l - Notice the changes in the file permissions. Originally the file index.html was the only file available for web browsing, after the chmod command all the files in the directory are available.
- logout - This ends the telnet session.
- The following commands will be useful.
- cd <directory name> to change directories
- cd .. to go up one level in directory
- ls -l to list contents of directory
- rm <filename> to remove a file
- chmod 755 *.* to change permissions of all files in a directory. If you use subdirectories you will also need to set their permissions.
- quota -v to view disk quota
- logout to end telnet session
- Test the web page again
This page is maintained by
Scott Van Bramer
Department of Chemistry
Widener University
Chester, PA 19013
Please send any comments, corrections, or suggestions to svanbram@science.widener.edu.
This page has been accessed
times since 5/30/97.
Last Updated 5/20/98